Tuesday, December 4, 2012

My friends are amazing

Everyone likes, or I assume they do, a refinished product. My crafty little friend has taken a side table that she had and decided to refinish it to give it a rustic shabby look.
What she did to get this look was: she sanded it down to remove any finish that was already on it and then  painted 2 coats of antique white flat finish. After that was dry she painted one coat of turquoise flat finish (let it dry) and then proceeded to sand it again by hand to distress spots that she wanted to have a more rustic look. To finish off the product she used a sponge brush to add Valspar Antiquing Glaze in small areas and then wiped it clean with an old t-shirt immediately. Depending on how dark you want the spots, you can re-apply. Thanks for sharing this, Shelly! 
Happy Refinishing!

Saturday, November 3, 2012

Redneck Wine Glasses

This is evidently the new craze, and thus...my new DIY project. Okay...let's talk about the cost of these suckers if you buy them off of the Internet. I've seen them listed anywhere from $8.99 to $15.00 a piece. That's outrageous considering what it costs to make these bad boys. Plus...who wants to buy just one? You never should be a solitary redneck.


A box of 12 Mason Jars (16oz) can be found for $10.35...I'll give you a second to do the math. Got it? Yep...that is roughly $.86 cents a jar. WAIT! I've got one even better for you...it's quite possible that your friend down the street has one or two and will give them to you...do the math...that's called FREE. Or maybe you've got some leftover from Jim Bob and Darlene's wedding shower that you threw for them last month. Upcycle people.  
Moving right along. Now we need to take a look at the candlestick holders. We aren't talking Waterford, and if you are, then let's be reasonable...you shouldn't be drinking out of a Mason Jar, let alone attaching it to one. Go to your local Dollar Store or Dollar Tree...you can get the Glass Taper Candles for like $1.00 a piece. You may have to buy 12 though.

Now comes the glue. Watch out...you're gonna have to drop about $2.00 for this stuff. Seriously though...watch out...this stuff will glue your skin together. Best to wear protective gear.

Okay. So now you have the 3 things needed to make your Redneck Wine Glass. This is what you do. Put glue on the top of the candlestick holder, on the bottom of the Mason Jar, and then put them on top of each other. Let it sit for quite a bit....don't rush in to use them right away. Follow the directions on the back of the Super Glue for how long you should wait.


Ready for a little more math?? You bought enough stuff to make 12 of these glasses. If you bought them online, which you would probably get 4, you would spend at the least somewhere in the $30 dollar range. If you make them yourself...you get 12 of them for $24.35. Which comes to just a little over  $2.00/piece.  Ahhh...doesn't that adult beverage taste a little bitter now? It could even cost less if you were making the 1/2 pint wine glasses. Now you have a wonderful gift for that Christmas time gift exchange that you were supposed to spend $25 on. OR you're kicking yourself for purchasing these online for a jacked up price...either way...


Happy drinking!

Friday, November 2, 2012

INVITATIONS - FOR ANYTHING!

You all know that you can go out and spend your hard earned cash to pay for "Print at Home" Invitations. You can also search the wonderful world of the Internet to have some printed for you. Why? Why shell out the big bucks when you can design them yourself. Sure..it takes some of your precious time, but what you're left with is...well...precious. Plus, it sure feels good when you have a finished product.
Yes...I blocked out the address and phone number.
Come on people...we don't need strangers at our pig party.
This is way too easy to pay for people. Do you have any kind of software? Any at all? Usually all computers come with some sort of paint. But, even if they don't, a really good one to have is anything Adobe...Photoshop is great but all of these can get a little expensive. If you're just starting out...go with something a little less expensive to make sure you are "in it to win it".


I'm not going to go in to the "how to make a birthday invite with Adobe Photoshop"...you can google that. However, I will tell you that all it is is basic layers, colors, and whatever font you can find. If you need further instruction, just hit me up with a comment and I'll help you out. Hint: Size 5x7, first rectangle is on the base and the second one sits right on top of it. The images can get a little trickier though. These are called "vectors" or you can use clip art. As far as I know, you aren't selling these bad boy invitations...so steal some off of another site.


Now take a look at what I've done above. A little glitter paper, glue dots, and a ribbon and I've got a invitation to be proud of.

Happy Inviting!

Tuesday, October 16, 2012

Tools of the trade

Some of you may be wondering what products I use for sewing and embroidery, so here they are.
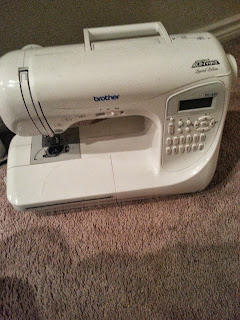
This is my sewing machine. I absolutely love products made by Brother. This is the PC-420 project Runway limited edition model. It is on the floor for my use because of having to watch the little people while I'm sewing. 
This is my embroidery machine...also, of course, made by Brother. It is the 770 model. I love this machine and it does up to a 5x7 Hoop size. That's my poor little embroidery table. Feel sorry for me. 

Wednesday, October 10, 2012

OH NO! I don't have a pumpkin stencil!

We all love to carve pumpkins, don't we? Okay...well maybe not. Carving pumpkins is only fun AFTER someone else takes all the guts from the pumpkin. Like when you make your kids do it....
And then you get to have all the fun carving and blame it on the fact that they are too young to handle weaponry.
This was a really fun day for all of us. We let the boys pick out what they wanted to have carved on their pumpkins, and Daddy cut them out for us. We didn't go to the store and pay too much for pumpkin stencils...that's dumb. Sorry. It's just not smart. Print them off your computer. You can actually print anything off...and it goes on to paper. It's really weird. Ink. Weird.

Anyways...so we looked on the computer for what designs we wanted and I copied them by hand, haha...I don't have a printer. Or ink. ;) Then we used tape, any kind of tape will do...as long as it sticks to the pumpkin. You may have to measure down the paper a little bit to fit the curves. Then use an ice pick, or anything with a pointed end, and jab it into the paper following the pattern. This will serve as directions on where you will be cutting out. Space the pointed pricks out a little bit, there isn't any need to make a thousand of these puppies. Once you are done poking holes you can use a knife to cut out the pattern. Good deal!
If you want to go with a unique look, use your husband's drill to make holes in your pumpkin. Pick your size drill bit, and get to work.

Happy Carving!