Showing posts with label expressions vinyl. Show all posts

Wednesday, November 20, 2013

Letter to Santa Pillow

You know that I'm big on Christmas...everything Christmas. My house is actually in the North Pole and people call me Claus. ;) What's a better way to communicate with Santa then a direct pillow talk route? My kiddos love to write letters to Santa, well...not the ones that can't write...or speak yet for that matter, so a fun way to do this is to have them write their letter and put it in Santa's pouch. They can even write a letter on Christmas Eve for Santa and he can leave his response back in the pouch for the kiddos! Pretty much you can put whatever you want in the pouch, or nothing at all. You can give this as a gift and put some Christmas goodies in it like cookies, candy canes, gift cards, subpoenas etc.


**If you are feeling extra crafty, which evidently I am because my friend told me I am, you can put your children's names under the belt so that they can have their personalized letter to Santa pillow. 
The Tutorial:


I used red fleece from Hobby Lobby and cut 3 pieces 12x12. I used a tape measure.


I used the fake fur, also from Hobby Lobby and placed a 2 inch wide strip down the middle (I sewed on both sides leave) and then sewed 2 black buttons on. 


Take your 3rd piece of fabric and fold directly down the middle and iron it. I used my silhouette cameo to cut out the pieces for the belt, but you can use whatever you would like. Then I used my iron and put them on the fabric. 


Match up the bottom belt piece to the front of the Santa suit. 


Place your extra piece of fleece and put down on top of the layers creating a sandwich. 


Pin your pieces together. I pin my stuff like this...I'm not sure how other people pin their projects together - but I like to do it this way. Make sure to mark where you will leave your opening to stuff the pillow. I left my opening by the "arm" of Santa. 


Pull your fabric out the little arm hole and make sure to poke all points with a tool...such as your scissors. Your next job is to either use your pillow form or some cluster puff...both of which you can buy at Hobby Lobby. 


** Disclaimer...I have no idea how good you sew - so if you have small children who like to eat things, make sure you get those suckers on tight or use the heat adhesive vinyl to do fake buttons. **


Thursday, October 17, 2013

An apple a day keeps the...witch doctor away?

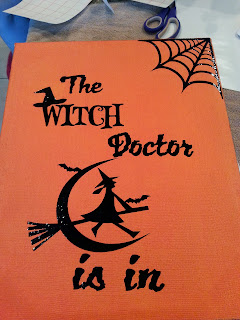
This project was not easy...I repeat NOT EASY. I do not recommend this. I used burlap canvas that I painted for this project and it was super difficult to get the vinyl on there.
First I took a roller brush and painted the sign (from Hobby Lobby) pumpkin patch orange by Glidden. It was a great color and turned out wonderful. Those are shoes on the floor in the background...they play no role in my project. 

These were the 2 designs I came up with on silhouette studio. The Doctor's office picked which one they wanted. The word "Witch" and the flying witch were both purchased off of Silhouette online store (with my nifty little $10 gift card they gave me). The fonts are from Dafont. If you don't know how to get fonts off of other places, let me know and I will do a brief tutorial.


I get my vinyl from Expressions Vinyl. It is great quality and you can get big gigantic rolls that are 10 yds. Okay...so once again I goofed during the transfer step and I accidentally ripped off the D in Doctor. So, I had to improvise. I cut the transfer paper and made a black space where the D would be and went ahead and applied the vinyl and LATER cut out the D and just put it on there. I also thought that the sign needed a little more something and added this great spider web to the top.

I then set it up all nice and cute looking so I could use it to share with all of you. 

Happy Bewitching!