Showing posts with label silhouette. Show all posts

Friday, October 25, 2013

"Witch" One?

When I was growing up I don't really recall having a say in what I was for Halloween....or maybe I didn't care due to my infatuation with candy - it didn't really matter as long as I got my bag filled. My oldest daughter, she's almost 3, gave me a run for my money. She was all about Doc McStuffins and couldn't wait to get her costume...and then it got here...she wanted to be Princess Sofia. Yep. Nothing else would do except Princess Sofia - so since I am mother of the year to quiet the madness...we went with Princess Sofia. If you read my post last night, then you were able to see my youngest, 15 month old, wearing her witch outfit.

 Today Miranda had to be a witch too. Hello number 3 costume. She put it on and loved it for about 4 minutes and then wanted to be Sofia again. Goodness gracious. Long story short...she will be a witch for Halloween. Tonight they went to a 'trunk or treat' and sported their cute little outfits.
 

When I bought Maggie's witch hat...I did not realize that I was going to need another...and of course they did not have anymore left. So, the only thing left to do was to break out the silhouette machine and get to work. Although, you don't have to use a silhouette machine - it just makes life easier. First thing first, I found a 3-D witch hat pattern (which is really used for candy holding) on the online store and printed it out on card stock. I don't have the fabric cutter so that wasn't an option for me - but I will get it one day. 
Top pieces are the card stock and bottom are the fabric pieces. I just traced the pattern onto my fabric and used my scissors. 

Next I pinned it right sides together and sewed it up. After that I turned it right side out and took some odd looking tool that obviously belongs to  my husband, although I have never seen him use it - or many tools at all for that matter, and poked it up the top to get the pointed look. Then I proceeded to fill it with stuffing.


Pin the round circle piece to the bottom of the hat, right sides together and then hand sew. When finished sewing, tack down a piece of felt or any thicker material to cover up the hole in the middle. Add a headband or whatever other tool you need to hold this to your child's head. 


And BOOM...there it is. I somehow misplaced the green strip of fabric that I was going to use around the hat, but I have every intention of gluing some orange ribbon around it. So there is an example, although it is not complete yet. 


Here is my Lovey. I used alligator clips to hold the hat to her head - I just slid them underneath the thick felt piece. 

Tuesday, October 22, 2013

Decorating Pumpkins with Vinyl

I love to carve pumpkins, but when you do it too early then all you have on Halloween night is a rotted corpse of a pumpkin and nobody ringing your doorbell for candy. So, with that being said...I decided that I would fix up one of my pumpkins with a little vinyl.

After I put the vinyl "H" on, I decided I wanted to spruce it up with spiders and a cobweb...well I had to go with white glitter because there was no black in the double sided adhesive kit I got from the Silhouette store. For the spider and the cobweb I used the double adhesive paper - so that allowed me to add glitter to the top. I think that this project turned out alright...it's not my favorite, but it is definitely something to set out on the porch. Oh...and my dog chewed the stem of my pumpkin for me...how nice. 
Prior to the glitter and dog chewing. 


My girls at the patch. 

Saturday, October 19, 2013

Cupcake To Go

This is a real fun project! If you have any parties coming up and you want to go all out...these are the things to do. First, I used my Silhouette Cameo to cut out the design that I found on their online store.

After they cut out you just pull them off and this is what they look like. 


Take the pieces and fold to shape the box. 


Take a glue stick or glue of your choice. I used those little glue dots and glue together where the pieces fit. Then I took a sandwich bag and cut it and inserted it where the window box is. I'm sure there is something else you could use, but this is what I had...so I utilized it. 


Here it is! That's a muffin...not a cupcake - but you get the idea. When I noticed that the picture was blurry...I had already eaten the muffin :-/

Happy Cupcake Boxing! 

Thursday, October 17, 2013

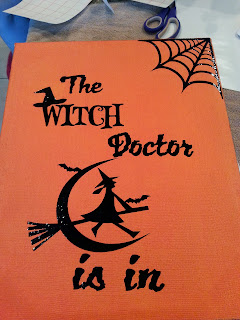
An apple a day keeps the...witch doctor away?

This project was not easy...I repeat NOT EASY. I do not recommend this. I used burlap canvas that I painted for this project and it was super difficult to get the vinyl on there.
First I took a roller brush and painted the sign (from Hobby Lobby) pumpkin patch orange by Glidden. It was a great color and turned out wonderful. Those are shoes on the floor in the background...they play no role in my project. 

These were the 2 designs I came up with on silhouette studio. The Doctor's office picked which one they wanted. The word "Witch" and the flying witch were both purchased off of Silhouette online store (with my nifty little $10 gift card they gave me). The fonts are from Dafont. If you don't know how to get fonts off of other places, let me know and I will do a brief tutorial.


I get my vinyl from Expressions Vinyl. It is great quality and you can get big gigantic rolls that are 10 yds. Okay...so once again I goofed during the transfer step and I accidentally ripped off the D in Doctor. So, I had to improvise. I cut the transfer paper and made a black space where the D would be and went ahead and applied the vinyl and LATER cut out the D and just put it on there. I also thought that the sign needed a little more something and added this great spider web to the top.

I then set it up all nice and cute looking so I could use it to share with all of you. 

Happy Bewitching! 

Wednesday, October 16, 2013

Borrowing is not stealing...well I'm not taking it back

I'm supposed to have a really awesome finished project to show y'all right about now...yeah I don't have it ready. BUT, I will....just not now...well lets be reasonable, it's not happening tonight. I have 2 Halloween projects that I'm in the middle of plus I'm still waiting on my hubs to go down the street and borrow some wood scraps from the new house being built.
This isn't a very good picture. It's a little further away than I thought it was, but that pile there that you see is wood...and I want it. Before you call the police, we aren't stealing it. They will throw this away, but if it will make you feel better I will call the construction manager in the morning to let him know that it will be gone and down at my home should they wish to retrieve it. 

Just to keep y'all interested though...here's another pic of the fabulous project that I will do the tutorial on -TOMORROW. I will also be working on a Witch Doctor sign that should be equally fabulous. 

Also...take a look at this amazing cup cake holder by Rivka Wilkins.
Those are absolutely adorable and I will be doing a tutorial -SOON ...not right now so don't get all huffy when there isn't an automatic post following this about cupcake boxes. And don't you dare look tomorrow either and wonder where it is because it won't be here...definitely not the cupcake because I will have eaten that. Anyways, for you lovely Silhouette owners you can find this design on the Silhouette online store. 

Happy Waiting...again

Delivering Christmas

I posted yesterday that I would finish the Christmas subway art today and I have!

What you see here is the finished vinyl with the negative removed. Like I said before, I do not suggest doing that way. It was a pain in the rear end both taking them out and then again after I had painted over the stencil. 
Next I applied all by myself with my wonderful husband, the transfer tape and transferred the design onto the wood. I think the "Away in a Manger" is supposed to look like snow...it doesn't. You will see that I left this off in the next post. 
I took the wonderful paint that I got from Home Depot (the Behr paint) and covered the stencil using a sponge. You don't have to lay it on too thick because if you do (and then you let it dry too long) you may accidentally pull up your paint when you remove your stencil. Notice that I did not paint the bottom - I used judgement here and figured that this was not going to turn out well if I did paint it. Let this dry about 10 minutes or so before peeling off. If you notice it is drying very quickly, then use your own judgement about removal. Peel back slowly. 
I let it dry for about an hour before sanding over the entire thing. I sanded the painted letters to give it a better look to it. 
The final project! I really like how it turned out. I may use a little stain in some areas and a good wipe down in others where you may be able to see the white paint from sanding. Otherwise...looks old and rustic and I like it! 
Happy Subway art...ing! 


* I forgot to mention that this was supposed to be a 12x24 inch project. My silhouette machine ate the rest of the lettering. I'm really not sure what happened. The vinyl started twisting and turning and then it just all went to crud after that. I may have my husband cut this down or fill in the negative space with some cute vinyl decals! 

Tuesday, October 15, 2013

Silhouette Cameo...my new love

So...I have found a new love and it is the Silhouette Cameo! It is absolutely, without a doubt...amazing. 
There's that beauty right there...eating some vinyl. Today I have started some subway art and will continue to post until the project is done. If I didn't have 5 little people, I'd live a life of luxury in the Bahamas I could get this done much faster...but somehow I ended up with them so I'm kind of stuck. ;) The first one I'm going to talk about is my Christmas project. 
I started out by going to home depot and buying a 24x24 inch board that cost me little to nothing. While I was there I went ahead and picked up some red Behr paint (sample size since that is more than enough) for a little over $2. That other thing is what we like to call a paint brush...and I already had that. 
I painted the board the red color, I didn't need primer because Behr is greatness and comes with it in there, and I sanded the edges to round it out a bit. You don't have to sand it..but I did because I like the edges better, plus I will stain them later to give it a more distressed look. After this I had my wonderful husband cut the board in half to make two 12x24 inch boards. No picture...sorry. 

Okay...this is obviously not the finished product. In the first picture there you see what is called Silhouette Studio...it kind of works like Photoshop, but for cutting out projects. Below that is the vinyl that I am currently working on. I'm taking out the negative and so you see the blue coloring underneath. That color will not be there. What I'm doing with this particular project is making it into a stencil so that I can lay it on top of my board and use another paint color to paint on top. There is an easier way to do this. So why didn't I do it the easier way? Because I painted my boards the wrong color. I will show you the easier way at a later date...or you can comment and I will go ahead and answer. 
This is not the same project, but I just wanted to show you this nifty little tool that helps to take out the unwanted vinyl. This is made by cricut. Silhouette also has one, but not one hobby store in my area sells it, which I find odd. Anyways, this is called a weeder - I believe...if not then it is just that tool that they use at the dentist office. 

Okay..that's it for this one. Tomorrow I will fix it all up and post the end result.
Happy waiting!